
Phaseburn One lives inside your DAW as an ordinary instrument plugin. Notes play the voice — one voice at a time, by design. Pitch bend bends the sounding note, ±2 semitones by default; the Pitch Bend Range row in the header’s cog menu widens that to as much as ±24 semitones, or ignores the wheel at 0. Control changes (CCs — the messages hardware knobs and faders send) can be mapped to the instrument’s controls through MIDI learn. Velocity and aftertouch — how hard you strike, then how hard you press — are modulation sources, covered in the modulation chapter (Chapter 4 — Modulation). The host’s clock drives everything tempo-synced — LFO divisions and the sequencer’s bar lines — and what starts the sequencer itself is the MIDI Mode in the keyboard row along the bottom: out of the box a held note is the transport (KEY TRIGGER), and FREE RUN hands it to your DAW’s transport instead. This chapter covers the modes, the mapping and the clock, plus what to try when a particular host has other ideas.
MIDI learn
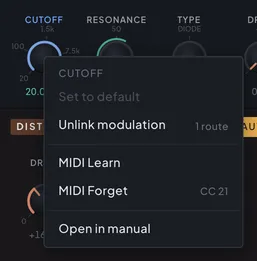
Put the filter cutoff under a real knob in ten seconds. Right-click the CUTOFF knob on the FX tab, choose MIDI Learn, then turn the hardware knob you want to own it. While it waits, the control’s caption pulses between blue and amber and the help bar at the bottom names what it is listening for, so an armed control is obvious from across the room. Turn a knob and it is captured; the caption settles to a steady blue and the help bar tells you which CC it took.
Only a control you actually move can be captured. A knob that was touched earlier in the session, a pedal you never press, a mod wheel resting somewhere other than zero — none of them can claim the assignment, and neither can a single step of encoder jitter; a sustain pedal you do press captures normally, its full swing easily clearing that threshold. Nothing is armed forever either: Esc cancels, so does clicking anywhere else, and an arm nobody answers gives up after twenty seconds.
To map a whole controller, repeat that gesture control by control. Mappings are one-to-one — a CC drives one control, a control listens to one CC — and learning a CC that is already in use, or re-learning a control, replaces the old pairing. Two CCs can be spoken for before you start: with Program Change In switched on, CC 0 and CC 32 are read as bank select and never reach MIDI learn — see Program change (Chapter 10 — MIDI & Your DAW). There is no separate mapping panel: right-click a mapped control and the same context menu shows which CC it holds, right beside MIDI Forget.
The editor is where mappings are made, not where they run. CC handling lives in the audio engine itself, so once a knob is mapped you can close the editor and keep playing. And incoming CC moves are applied as genuine parameter changes through the host, so your DAW records them as automation on that parameter’s lane. The instrument brackets each run of CC movement in an automation touch gesture — recording punches in when your hand moves and out when it rests.
A hardware knob on a control the PLL macros steer is a case of its own, and it works. Map TRACK, DAMP, BURST or any of the other controls a macro sweeps, turn it while the macro layer is driving, and the macro that owns it hands its controls back — the loop holds exactly where it stood, your value lands on top, and that dial returns to HOME. The other three macros carry on. The MACRO view (Chapter 2 — Oscillators) covers what handing back means.
To unmap, right-click the control and choose MIDI Forget. To reset a control to its factory value without touching its mapping, the same menu offers Set to default. The same menu also carries Unlink modulation, which clears every modulation route currently aimed at that control in one gesture — the caption tells you how many it will clear before you commit, and it is greyed out when there are none. The routes’ amounts are left alone, so picking a destination again restores the depth the route had. There is no undo for it.
High-resolution controllers
Some controllers send a knob as two messages: a coarse byte on one CC and a fine byte on the CC 32 higher, which together give 16384 steps instead of 128. Phaseburn One recognises that pairing on its own — nothing to switch on — and treats the two as the single control they are. You learn it by turning the knob, exactly as with any other, and the context menu reports it as 14-bit beside its CC number. The fine byte never becomes a control of its own, which matters: on its own it races through its whole range several times per turn of the hardware knob.
Assignments follow the controller
In the standalone, what you map is remembered against the input device you mapped it on. Plug a different controller in and its own assignments come back, rather than a layout made for something else; plug the first one back in and yours return untouched. Each controller keeps its own set, and there is nothing to tidy up between them.
A plugin has no device of its own — your DAW decides what reaches it — so there all instances share one set of assignments, and the cog says as much where the standalone shows its device picker. Your hardware still works: route the controller to the instrument’s track as you would for any plugin, and MIDI learn takes whatever the host sends.
Input modes
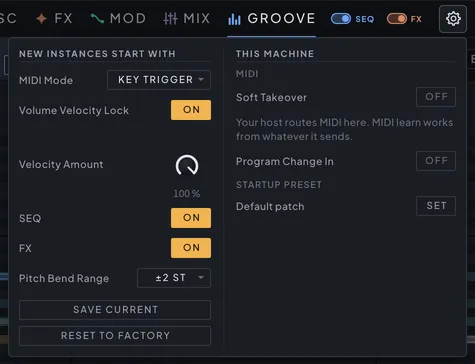
Decide what your keys do: trigger the sequence and steer its pitch, feed it your harmony, or play the voice yourself. The MIDI Mode selector sits in the keyboard row — the control row above the on-screen piano, under every page in every format — next to the velocity and pitch-bend controls, so what this instance plays right now is always in reach while you play. The cog menu in the top-right corner is where the same settings appear as standing arrangements rather than as this instance’s, and it opens in two columns. On the left, New instances start with — the word a brand-new instance is born with: change one and every plugin you add from then on arrives set up your way, while the instances you already have keep playing as they are. One click, Save current, copies this instance’s settings up. On the right, This machine — the settings that belong to the computer rather than to any instance or project. The instance settings themselves are recalled with your DAW project and — deliberately — never changed by loading a preset: pick KEY TRIGGER for a track once and every patch you audition arrives playable the same way.
KEY TRIGGER is the default, and it makes your keyboard the sequencer’s transport. Silence until you play; press a key and the phrase starts from step 1, transposed so the note you played acts as the root; play the preset’s own root, shown in the browser’s footer, and it sounds exactly as saved — every factory sound is made to play right around C3, middle C. Hold the key and the line runs; let go and the sound rings out through its release and the sequencer waits for your next attack. Change notes legato — new key down before the old one is up — and the line transposes mid-flight without restarting; strike again from silence and the bar re-rolls its dice and begins again, so short stabs play the phrase’s opening and every re-attack is a fresh take. The DAW transport is not consulted: like an arpeggiator, it works with the host stopped, and a held note in your piano roll is all it takes to print the line into an arrangement. Playing below the root pulls the whole phrase down; above pulls it up — and the Notes tab’s piano shows it live: while you hold a key, the root marker slides there, dashed and softly breathing so it cannot be mistaken for the authored root, and the pool’s tints shift with it — exactly the notes the phrase is playing from your key. Release, and the roll snaps back to what you wrote. Playing never edits the patch: the temporary root is display and sound, not state.
CHORD FOLLOW feeds the sequencer harmony instead of a single root. Held notes stop sounding themselves and become the note pool the sequencer draws from — each key a candidate, how hard you struck it that note’s chance of being picked. It gates the same way KEY TRIGGER does: the phrase runs while your hand is down and stops when you lift it, restarting from step 1 on the next chord — so stabbed chords answer with the phrase’s opening bar, and changing chords legato swaps the harmony with the line still running. Entering the mode before you have played anything leaves your own pool in place, and leaving it always hands the sequencer your authored pool back, exactly as you left it. The sequencer chapter (Chapter 7 — The Sequencer) covers how the pool turns candidates into lines.
FREE RUN is the classic mode and the pre-August behavior: the sequencer runs on its own — following your DAW’s transport in a plugin, simply running in the standalone — and incoming notes play the voice alongside it, like any synth plugin. There is only one voice, so external and sequenced notes compete and the most recent event wins. That collision is a real technique — stab notes over a running line and the line folds around them — but if it sounds like chaos, it is chaos you asked for: switch modes, or flip the SEQ switch off.
In the two gated modes there is nothing to collide with: your keys drive the sequencer, not the voice. And whenever there is no sequence to drive — the SEQ switch is off, or the pattern has no beats at all — notes simply play the voice directly, so an empty patch under KEY TRIGGER behaves like a plain keyboard instrument rather than a silent one. The SEQ switch rides on the Groove nav tab itself, reachable from any page, and it silences the Groove page entire — the note sequencer and the SKIP and DRIFT knobs that would otherwise gamble with the notes you send — while everything outside that page carries on: the modulation sequencers, every tempo-synced division, and your MIDI. Like the mode, it is per instance — recalled with your DAW project, untouched by preset loads — so a track you drive from the piano roll stays that way through every patch you try; see One bar, one page (Chapter 7 — The Sequencer).
The velocity block in the same menu decides what how-hard-you-play means. Volume Velocity Lock levels how loud you played, and only that: every note-on sounds at the engine’s resting velocity — the level the sequencer and the piano roll’s own audition already use — however hard the key was struck. Leave it on when the patch is voiced the way you want it and your playing would keep knocking it off that voicing: a weighted keyboard under a percussive patch, a controller whose curve you cannot change, or a take where the loudness should come from the sequencer’s velocity modifiers rather than your hands. The lock stops at the voice’s own level. How hard you played still reaches everything that shapes the note — the Vel›Attack / Decay / Sustain / Release offsets on both envelopes, the VELOCITY modulation source on the Mod page, the notes the plugin sends to its MIDI output and Chord Follow’s velocity-as-chance — so a locked keyboard is an even keyboard you can still play expressively. It is an instance setting — your DAW project recalls it, no preset load touches it — and new instances start with it on unless the cog menu says otherwise; turn it off when the level itself should answer your hands.
The Amount knob under it narrows that hand for every reader, locked or not. It scales each note’s deviation from the resting hit before anything sees it, so 100% is your keyboard as it is, 0% is a flat hit everywhere — the envelopes and the modulation routes included — and the range between tames a wild controller into something playable. Under the lock, Amount is therefore the control that decides how much dynamic still reaches the shaping; with the lock off it does the same job to the loudness as well.
As Strength, on the Notes tab’s PERFORM module, reads your hand a different way: the raw struck velocity — before the lock or Amount touch it — becomes the note’s strength, the same quantity the sequencer’s strength map assigns to its own notes. It drives the NOTE STRENGTH modulation route and per-note SKIP/DRIFT targeting, and in the gated modes the strike sets the whole phrase’s strength — so a hard attack can open a filter or harden a transient across the bar while a soft one keeps it tame, even with the loudness itself locked flat. It is the one preset-carried piece of the MIDI response — part of how the patch expresses — which is why it lives with the patch’s other performing controls rather than in the cog. The lock and As Strength are deliberately independent: lock the level, keep the expression.
Keyboard Octave is the OCT ± of a hardware keyboard, for this instance: incoming notes are shifted by whole octaves before anything else looks at them — before KEY TRIGGER measures them against the root, before CHORD FOLLOW collects them into a pool — so it behaves exactly as if you had pressed a different key, MIDI OUT included. A note-off always releases the note its note-on started, even if you move the octave while holding. It has no on-screen control: reach it from your host as Keyboard Octave (automation or MIDI learn). It is never saved with a preset and never a global default, on purpose — a remembered octave shift is a shift you forget about. To voice a sound an octave away, use the preset’s Octave instead (at the left of the keyboard row under every page) — that one travels with the preset, and it is how a factory sound stays playable around C3 whatever register it lives in.
Note Priority decides which held note leads when several arrive — the most recent, the lowest or the highest; it has no panel control, being exposed to the host rather than drawn on the window. It comes up again with glide in the oscillators chapter (Chapter 2 — Oscillators).
New instances start with — the cog menu’s left column — is what a brand-new instance starts from: the moment a fresh Phaseburn One initializes for the first time, it copies these six — MIDI Mode, Volume Velocity Lock, Velocity Amount, the SEQ and FX switches and the Pitch Bend Range — and from then on owns its own values. Editing one never reaches back into an existing instance, this one included; it is a promise about the next one. Set them once — “my instances start volume-velocity-locked, in Key Trigger, bending ±12” — and every new track arrives set up your way. Two buttons close the column: Save current captures this instance’s whole setup in one click, and Reset to factory puts the same six values back the way Phaseburn One shipped. Nothing in the right-hand column moves either way — the two are independent.
This machine — the right column — is the computer’s own. Its MIDI section starts with Soft Takeover for MIDI learn: off to begin with, so a mapped knob takes the parameter the moment you touch it. Switch it on and a mapped knob instead stays inert until it passes the value the parameter is actually sitting at, which is what you want after loading a preset: nothing lurches to wherever your hands happened to leave the hardware. A mapped switch is exempt either way — it toggles on the first press, since there is no position for it to catch up to. Under it, a plug-in simply says that your host routes MIDI here, while the standalone gets its MIDI input device and channel and then the MIDI Clock In and Transport In switches described in Following an external clock (Chapter 10 — MIDI & Your DAW). Every format ends the section with Program Change In — whether program numbers pick presets, covered in Program change (Chapter 10 — MIDI & Your DAW).
Below the MIDI section, the standalone carries an AUDIO DEVICE block for the output and input the app opens (No sound? Check these (Chapter 1 — Getting Started)). Last in the column, for every format, is the STARTUP PRESET: Set captures whatever is loaded, and from then on every brand-new instance opens with it — restored DAW sessions are never touched, and Clear puts the default patch back.
Playing without a controller
Every format carries a keyboard strip under every page — a performance row over a piano — because notes are the transport and a mouse should be enough to work with them. The piano is the Notes tab’s roll again (C0–C6, every key in the same place), but here a pressed key is played, not auditioned: in KEY TRIGGER it runs the phrase from that key, in CHORD FOLLOW the keys you hold are the chord, in FREE RUN they simply sound. Keyboard Octave, Volume Velocity Lock and Amount apply exactly as they do to a hardware key. Where you click on a key sets the velocity — soft near the top, full at the bottom — which the envelopes and the VELOCITY source read whether or not the lock is holding the loudness flat. Drag across the keys to glide: the next key goes down before the last comes up, so KEY TRIGGER re-roots the phrase without restarting it. Held keys light amber on the strip; the note that sounds lights blue on both rolls. While the sequencer can play, the strip also marks the root and the scale the way the Notes roll does; with an empty beat grid, or with SEQ switched off in the header, its keys go unmarked, since nothing would follow them. The Notes roll always shows them.
The row starts with the preset’s OCTAVE — the one control here that is saved with the preset; everything else in the row belongs to the instrument. Next to it, LATCH: on, keys stay down after you let go, until you switch it off. It reads your two keyboards differently, because they are played differently. From a hardware keyboard, releasing keeps the notes held, and the next press with nothing held replaces them — KEY TRIGGER restarts on the new key, CHORD FOLLOW takes the new chord — while a press with a key still down adds to the chord as usual. On the screen, where a mouse has one finger, a click is strictly one note at a time: it replaces whatever the mouse holds, and a click on the note already sounding turns it off — chords are a hardware keyboard’s privilege, and notes your hardware is holding are never touched by a click. Held and latched notes also survive a preset change: loading a preset re-strikes whatever you hold, so browsing sounds under a held key simply keeps playing — KEY TRIGGER starts its phrase again on the new sound. Switching LATCH off releases everything you are not physically holding. Latch is never saved; every launch starts with it off.
On the right sit the instance’s MIDI Mode, Volume Velocity Lock, Velocity Amount and Pitch Bend Range themselves, so the mode and the feel of the keys stay a glance away while you play. The Standalone app adds two things a DAW provides itself: the tempo — its own, never a preset’s, remembered between launches — beside LATCH, and the MIDI IN device and channel pickers at the right end. On the Notes tab, which has a roll already, the strip’s piano steps aside: the row sits just above the Notes roll, and that roll is then played the same way. And if you would rather have the pixels than the piano, the small piano icon at the bottom of the window — right after 1:1 — hides the strip everywhere but the Notes tab; the window slims to match, and the choice is remembered on this machine for every format.
Driving other instruments
Every note the sequencer plays is also sent out of the plugin as MIDI, carrying the velocity the generator gave it. Point another instrument track at Phaseburn One’s MIDI output and the probability engine plays that instrument; pull Phaseburn’s own Master volume down and it becomes a pure MIDI generator, a bar of rolled dice feeding whatever you like. All three plug-in formats emit it — VST3, CLAP and AU.
The stream matches the voice: one note at a time, each released before the next begins, and whatever is sounding is released when the transport stops, so nothing is left hanging on the receiving instrument. Notes you play in yourself are not echoed — this is the sequencer’s output, not a MIDI thru.
How you pick it up is the host’s business, and support varies: some hosts let a track listen to another plug-in’s MIDI output directly, some expose it only while the source track is record-armed, and a few do not offer plug-in MIDI output at all. Look for a MIDI input source naming the Phaseburn track. Recording that output to a clip is also the simplest way to keep a roll you like — the bar is re-rolled on every pass, so capturing it is what makes a variation permanent.
The standalone app is the exception: it has no host to send to, and its hardware MIDI output carries clock and transport only.
Clock and transport
The host’s clock is always the instrument’s clock: tempo, bar lines and every synced division come from the DAW in every mode. Who starts the sequencer depends on the MIDI mode. In the gated modes the phrase anchors to your note — press a key on beat 3 and the phrase still opens from its step 1, deliberately free of the host’s bar grid — so the rest of this section describes FREE RUN, where the host transport takes over.
In FREE RUN, press play in your DAW and the sequencer plays; stop, and it stops. The host transport is the instrument’s transport, with nothing to arm on the window, and a transport start plays from the top: beginning playback hard-resets the sequencer to beat 1 of bar 1 — the step modulators and synced LFOs restart with it — rather than picking up wherever the playhead happens to sit, so every take opens the same way. A take launched mid-bar falls into line with the DAW’s bar lines at the first loop wrap or relocate. While it plays, the sequencer phase-locks to the host timeline: it continuously derives its position from the host’s, bar-anchored so its downbeat sits on the DAW’s downbeat.
Phase-lock is what makes loop-based work behave. Loop four bars and every wrap snaps the sequencer back into step. Relocate the playhead and it follows. Change tempo — even a ramp — and the playhead and pending notes rescale rather than drift. When the host jumps far enough to matter, the sounding note is released cleanly first — a relocate never leaves a note hanging. And because a Phaseburn bar is probabilistic, every wrap rolls the dice again: the loop plays a fresh variation of itself each pass, by design — record several and keep the take. The sequencer chapter (Chapter 7 — The Sequencer) covers what gets re-rolled.
The bar follows the host’s meter, and it can only shrink. A Phaseburn bar is a 4/4 grid, so an odd meter masks its tail off instead of stretching it — a sixteenth stays a sixteenth. 3/4 and 6/8 play the first three quarter notes and wrap, 7/8 three and a half; 5/4 and 12/8 clamp back to a full bar. The Beats grid draws that cut — a dimmed panel over the masked region, a cut line, an OUT OF BAR caption. GENERATE still composes a full 4/4 bar, so in an odd meter the tail of what it writes is never reached.
The lock reaches past the sequencer. When it re-seeks, tempo-synced LFOs and the step modulators re-phase too, so synced modulation lands in a bounce where it sat in the room. Step modulators in retrigger mode keep their note-driven phase.
Following an external clock
In a plugin the host is the clock and there is nothing to choose. The standalone has no host, so the MIDI section of the cog menu’s This machine column decides whether it runs on its own tempo or on someone else’s. MIDI Clock In hands the tempo over: with it on, the app follows the clock arriving at the MIDI input instead of the TEMPO field in the keyboard row, and every synced division, bar line and LFO follows with it. Transport In hands over the position: START plays from beat 1 of bar 1, STOP stops, CONTINUE resumes where the master left off, and a Song Position Pointer moves the sequencers and the synced LFOs to the bar and beat the master names — so looping or relocating on a drum machine, a groovebox or another DAW moves Phaseburn One with it. A pointer that arrives mid-flight relocates at once; one that arrives while the transport is stopped waits for the CONTINUE it belongs to. Both rows are off to begin with, and both are per machine rather than per project.
In the note-gated modes a relocate is ignored while nothing is held — your key is the transport there, and an external pointer has no phrase to move.
When you go looking for the standalone at the other end — in your system’s MIDI setup, or in the app you want to slave it to — it names itself Phaseburn ONE: its client and both its ports carry the product’s name, so Phaseburn ONE input is what you send clock and notes to and Phaseburn ONE output is what carries its clock and transport back out.
Program change
Your controller’s program buttons can change presets. Program Change In, at the foot of the cog menu’s MIDI section, turns it on — off to begin with, a setting of this machine rather than of a project, and receive only: Phaseburn One never sends a program change when you pick a patch in the browser.
With the row on, a program number 0–31 picks that slot in the current bank, and Bank Select — CC 0 for the bank’s high half, CC 32 for its low half — picks the bank before it:
| Bank Select | Bank |
|---|---|
| 0–7 | factory banks A–H |
| 8–15 | user banks A–H |
A Bank Select on its own never loads anything; it parks the bank and waits for the program number that follows. An address that does not exist — a bank beyond the sixteen, an empty user slot — is ignored rather than guessed at. Switching the row back off forgets any bank you had selected, so turning it on again never replays a stale address.
The change lands the way a preset change from the browser does: on the next bar line while a pattern is playing or a key is held, and immediately when nothing is sounding, so a program change on the back of a phrase does not chop it in half.
One host-side limit worth knowing before you map a controller: VST3 hosts pass Bank Select through but not program change, which is a property of the VST3 plugin interface rather than a setting here — so in a VST3 the program buttons will not reach the instrument. Use the CLAP build, or the standalone, where both arrive.
While Program Change In is on, CC 0 and CC 32 are spoken for: they are read as bank select and are not offered to MIDI learn. Turn the row off and both are ordinary CCs again.
When something misbehaves
Phaseburn One is v0.3.0 — early access, free through the beta period — and the plugin–host boundary is exactly where young software meets the most variety. Hosts differ in how they report transport position, when they record automation, and which MIDI they forward to an instrument. We test against a range of hosts but have not met every configuration, and this chapter’s features are the most host-dependent in the instrument. Before anything else, walk this list:
The sequencer plays nothing. In the default KEY TRIGGER mode that is the design: it waits for a note — play and hold a key, or send it one from a clip, and the phrase runs for exactly as long as the note does. For the sequencer to run on its own, pick FREE RUN in the header’s MIDI menu; there it follows the host transport, so the DAW has to be rolling. Then check the SEQ switch on the Groove tab: off mutes the internal note sequencer, and because that switch is saved with the project, a session someone else set up can arrive with it off.
The sequencer feels offset or ignores the loop. In the gated modes that is the anchor: the phrase starts where your note does, not on the DAW’s bar line — use FREE RUN when the grid should own it. In FREE RUN, phase-lock operates while the host transport is actually running — a stopped host gives the sequencer nothing to lock to. If the pattern stops short instead, that is the meter: the grid is a 4/4 bar and an odd host signature masks its tail.
Notes double-fire while the sequencer plays. That is FREE RUN doing its job: played and sequenced notes share the one voice. Switch to KEY TRIGGER or CHORD FOLLOW — there your keys drive the sequencer instead of racing it — or stop playing along.
A mapped knob does nothing. The editor is not required — mappings run in the engine — so suspect the route: confirm your host forwards CC messages to the instrument’s track. Some hosts filter CCs or capture them for their own mapping layers before a plugin ever sees them. If the route is fine, check soft takeover in the cog menu: with it on, a knob stays inert until it passes the parameter’s current value. And in the standalone, check which input device is selected — assignments belong to the controller they were made on.
MIDI learn will not take the control I am turning. The capture wants a deliberate movement, so give the knob a real sweep rather than a nudge. If your controller sends the same physical knob on more than one CC, whichever moves furthest wins, which is the one under your hand.
Hardware moves are not recorded. The instrument presents CC movement as parameter gestures; whether the host writes them depends on the track’s automation mode. Arm the track and pick a mode that records.
A note hangs after a relocate. The host lock releases the sounding note on every material jump, so a hanging note is a bug rather than a setting — catch it and we want the steps.
Anything that survives this list is something we want to hear about. Report it through the contact form with your host and its version, your operating system, and steps to reproduce. Per-host quirks are precisely what the open beta exists to find, and fixes ship in updated builds.