
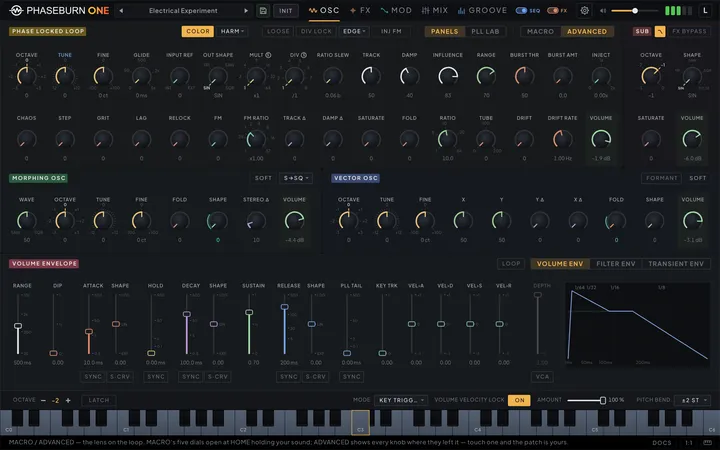
Phaseburn One is a groove synth, and one plugin does three jobs. As an instrument it loads inside your DAW like any other synth, and you play it from the keyboard, the piano roll, or its own probability sequencer. It runs one voice by design — every cycle of the engine goes into making that voice as rich as it can be — and it is optionally paraphonic: OSC DRIFT can hand each of the four oscillators its own note, so a single played note can bloom into a chord. As a groove generator, every note the sequencer rolls also leaves the plug-in as MIDI, so the same dice can drive any other instrument you own. As an effects rack, its stereo audio input arrives in the patchbay beside the oscillators, so your own tracks can run through the filter, the delay, the freezer and the rest with no note held. This chapter gets it installed, walks you around the window once, and has you making sound inside five minutes. Everything after this is depth.
Phaseburn One is free through its beta period. It is early software — version 0.3.0 — and there is one build for everyone: free to use until October 15, 2026, then a demo (a brief periodic dip, and no usable bounce) until you register a perpetual license, which you can do any time.
Install
Phaseburn One ships in three plug-in formats — VST3, CLAP and AU (Audio Unit, macOS only) — plus a Standalone application you can play without a DAW at all, for macOS (10.14 Mojave or newer, Apple Silicon and Intel) and Windows (10 version 21H2 — build 19044 — or newer, 64-bit; Windows 11 included). The Windows installer enforces that build number, so an older Windows 10 will refuse it rather than install something broken. Every format holds the same instrument; install whichever your DAW prefers, or all of them. The AU is what Logic Pro and GarageBand load — Phaseburn One appears there as a software instrument.
Each platform has a real installer — grab it from the download page, quit your DAW, and run it:
- macOS: open the
.pkgand follow it through. One of its steps is a component pane with VST3, CLAP, AU and the Standalone app all ticked — untick anything you do not want, and note that an install can never end up with no plug-in at all. The plug-ins land in/Library/Audio/Plug-Ins/VST3,/CLAPand/Components(the AU), the app in/Applications. On the Installation Type step, “Change Install Location…” offers Install for me only instead: the same files go under your home folder (~/Library/Audio/Plug-Ins/…and~/Applications) and no administrator password is needed. Your DAW scans both. - Windows: run the setup
.exeand pick an installation type — VST3, CLAP and Standalone (recommended), Plug-ins only, VST3 only, CLAP only, or Custom to tick the components yourself; Custom will not let you continue with nothing selected. The plug-ins default toC:\Program Files\Common Files\VST3and\CLAP— the top level of the folders every host scans — and the app toC:\Program Files\Phaseburn Music\Phaseburn ONE\, with a Start-menu entry. The standalone opens already sized to fit your screen, sharp at whatever display scaling you run.
Unticking a format only skips installing it — neither installer removes a copy that is already there. If you want a format gone, delete its bundle from the folder above.
Then start your DAW and let it rescan its plugins — most hosts do this on launch, and most have a “rescan” button in their plugin preferences if not. Once the scan finishes, Phaseburn One appears in your instrument list; add it to an instrument track the way you add any synth. The VST3 is listed among the effects as well, for hosts where that is the only way to feed it audio — see Audio from outside (Chapter 5 — Mixer & Patchbay). Installing a newer build over an older one is safe for everything that is yours: your user banks, your favorites and your license stay exactly where they were, and saved projects recall the sound they stored. The one thing that does move is the factory library — it ships inside the build and is still being curated, so a new beta build brings a new set of factory banks. If a factory patch has become the basis of something of yours, press SAVE and put it in a user bank first; The factory banks (Chapter 9 — Presets & Banks) has the full story.
macOS. If the package refuses to open, your copy predates 18 August 2026, when the installer was still unsigned; the signed build replaced it under the same version and the same filename, so nothing on disk tells them apart. Download it again and open the fresh copy — Troubleshooting (Chapter 11 — Troubleshooting) spells it out.
Windows. The installer is signed too, but SmartScreen scores reputation per signing
certificate and a new certificate has none until enough installs accumulate, so a blue
“Windows protected your PC” notice can still appear. Click More info, check the publisher
reads Pavel Burylichev, then Run anyway. You can verify the signature yourself first:
right-click the .exe → Properties → Digital Signatures.
Prefer placing files yourself? There is nothing to place — the download is the installer
itself, one file, and the plug-in bundles live inside it rather than beside it. Running it is
the only route, and on Windows it is also what installs the WebView2 runtime the interface
needs. It does write to the ordinary folders, so you can always see what it put where:
/Library/Audio/Plug-Ins/VST3 / CLAP / Components on macOS, C:\Program Files\Common Files\VST3 / CLAP on Windows. If you hand-copied a bundle into one of those from an earlier
release, delete it: the installer only manages the folders it wrote to, and a stale build left
elsewhere is still scanned and can shadow the new one.
If your host still does not list Phaseburn One after a rescan, Troubleshooting (Chapter 11 — Troubleshooting) walks through the causes in order — including the one that looks identical but is not: a host that found the plug-in, failed to load it once, and cached that verdict.
That is the whole install — no account needed. The build is free to use until October 15, 2026; after that it keeps working as a demo until you activate a license. How that works, and how to activate, is the next section.
Licensing & registration
There is one build for everyone, and it never stops working. It is completely free to use until October 15, 2026. After that, an unactivated build simply continues as a demo — the full instrument, fully playable, with a gentle few-second dip in the sound roughly every couple of minutes, and you cannot bounce or export usable audio from it — every render carries a soft noise watermark. The level meters keep moving right through a dip — they read the instrument, not the ducked output — so a moving meter over quiet audio is the demo rather than a routing mistake. Judge the sound by ear in demo and register before you commit a take: activating a license removes both, immediately and without a reinstall. Nothing else about the plugin changes between the free, demo and activated states.
Buying. A license is €149 one-time — perpetual, with free updates across the 0.x series. Sales open October 15, 2026 on the buy page; pay securely by card and your license key arrives by email the moment payment clears. If you already hold a key — licenses are also granted during the beta — you can activate it at any time.
Activating. Open Phaseburn One and click the logo in the corner. Paste your license key and click Activate — that takes an internet connection once, a couple of seconds. The badge disappears, and the help bar along the bottom now reads “Registered to <your email>” when idle. From then on the license is stored on this machine and verified fully offline — the plugin never phones home again.
What DRM-free means for you. After that one activation, your license lives on your machine, not on our servers:
- Activate once, offline forever — no account, no dongle, no always-online check. It cannot be switched off remotely, and it keeps working even if our servers ever go away.
- Use it on up to 3 of your machines at once — studio desktop, laptop, live rig. Moving to a new machine? Free the slot yourself on the license page — self-service, with a fair-use cap of a few deactivations in any 30-day stretch (contact us if you genuinely need more).
- It survives plugin updates: install a newer build and you are still registered.
A machine with no internet at all? The plugin’s activation panel shows a machine
code. Type it into the license page from any other device, download the
.pblicense file it gives you, and drop that onto the activation panel — done, and it stays
offline forever.
Moving machines, renaming, reinstalling. The license page is self-service: see your activated machines, rename them, deactivate one to free its slot, or activate an offline machine. The quickest way in is the Manage my machines button in your license email — it opens the portal already signed in, with nothing to paste, and it keeps working however long after the purchase you use it. Failing that, sign in on the page with your license key, or ask for a sign-in link by email. Reinstalling on the same machine never costs a slot. Lost your key? Re-send it from the same page using the address you bought with.
A tour of the window
Across the top of the window sits the preset navigator — the current preset name flanked by prev/next arrows that step through the presets, and which you click to open the browser — then SAVE and INIT, then a single row of five tabs. SAVE writes the sound you are hearing into a user slot without a trip to the browser: the same dialog as the Presets page, already pointed at the slot the current preset lives in, or at the first free user slot when a factory sound is loaded. INIT resets the engine to its default patch — a clean single-oscillator tone you can play straight away, with the effects off and headroom left to build into — and the transport at the right holds the cog menu — this machine’s defaults for brand-new instances, the MIDI input block, and in the standalone the audio device it plays through; this instance’s own playing settings sit in the keyboard row at the bottom — then a master volume slider, an output meter and the L limiter switch. That switch is also the only thing that gives Phaseburn One any latency: on, it reports 1.5 ms of look-ahead to your host, which compensates for it; off, it reports none. Flipping it mid-session makes the host redo its delay compensation, so set it once and leave it. Playback comes from your hands: out of the box a held note runs the sequencer and transposes it (see Input modes (Chapter 10 — MIDI & Your DAW)), and the FREE RUN mode hands that job to your DAW’s transport instead. The whole instrument lives on those five tabs; you are never more than one click from any of it.
Along the bottom of the window runs a one-line help bar. Rest the pointer on any control or module and it describes what you are pointing at — it is always on, and it is the only place the instrument explains itself, so nothing ever floats over what you are working on. Some controls put live readings there too: hover a patchbay cable’s gain knob and the bar shows its level in decibels. The DOCS button opens the related chapter of this manual right inside the plugin — with a contents list, a search box that finds sections and parameters by name, and a link to the full version on the website — and every control’s right-click menu has an Open in manual entry that lands on the same spot. Until you touch anything, the bar shows your licence state — beta, demo or who the instrument is registered to.
The window itself resizes. Drag any edge or corner and the interface scales with it, letterboxed so it always keeps its proportions — nothing crops or stretches. The 1:1 button, right after DOCS, snaps it straight back to the interface’s natural size for your display — 1280×800, the strip along the bottom being the keyboard you play it with (see the MIDI & host chapter’s Playing without a controller; the piano icon beside 1:1 hides that strip, and the window slims to 1280×720) — at 100% display scaling, proportionally larger where the OS scales the screen. The standalone remembers the window scale you choose and reopens with it; drag it off-ratio and the interface letterboxes rather than stretching. Inside a DAW, VST3 and CLAP both accept the same drag-to-resize from the host, held to a 640×400 minimum and a locked 16:10 shape so the interface can’t be squashed off-ratio. The Audio Unit is the exception, because AUv2 gives a host no way to resize a plug-in’s window: in any AU host the help bar carries 1×, 1.5× and 2× buttons just after the keyboard-strip icon, and those are how the AU window grows. Only the sizes your display can hold appear; where none of them is larger than 1×, there is nothing to choose and they are absent, along with 1:1. On macOS, the standalone is a normal resizable window: its green button opens full screen, and Cmd+Q quits it like any other application.
OSC, FX, MOD and MIX build the voice — each underlined in its own signature color when active. Each instance remembers the screen it was on — the page and its sub-tabs, down to which envelope or Groove view you had open: reopen its editor — or switch between instances in your DAW — and it resumes where you left it, and that memory travels with the project. Loading a preset never disturbs it, however the preset arrives — the browser, the header arrows, a bar-line switch, a MIDI program change. INIT is the one exception, and deliberately so: a fresh start shows the panels a fresh session shows, so it puts the FILTER switcher back on FILTER 1, the ENVELOPE switcher on the volume envelope, the Groove switcher on Beats and the MASTER EQ switcher on TONE. OSC holds the four sound sources — the Phase-Locked Loop (PLL), the VECTOR phase-shaping oscillator, the MORPH oscillator and the sub. FX is the filter and the effect rack. MOD is the LFOs, envelopes and step modulators that make things move. MIX balances the sources and sets the master section. Each is a chapter of this manual: the oscillators (Chapter 2 — Oscillators), the filter (Chapter 3 — The Filter), the effects (Chapter 6 — Effects & Master), modulation (Chapter 4 — Modulation) and the mixer and patchbay (Chapter 5 — Mixer & Patchbay).
GROOVE — underlined blue when active — is Phaseburn One’s own note engine, a probability engine rather than a step grid. The SEQ switch on the tab arms it: with SEQ off the page veils over and nothing on it reaches the sound — no notes are written, and the oscillator independence controls stop acting on the MIDI you play — while the modulation sequencers and that incoming MIDI keep running. That switch is per instance and travels with your DAW project. The GENERATE module spans the top of the page, with the three sub-tabs pinned to its right. Beats comes first and opens by default: the probability grid. Notes holds the pitches the engine draws from, the root your playing transposes around, and the PERFORM module — transpose and pool Register. Strength decides how hard each beat lands; Beats and Strength carry a row of modules along the bottom for note length, velocity and timing feel. It has its own two chapters: the sequencer (Chapter 7 — The Sequencer) and GENERATE (Chapter 8 — Generate).
There is no separate settings page. What used to live there is now one of three things: in the header’s cog menu (this machine’s defaults for new instances — the instance’s own playing settings live in the keyboard row), a right-click away on whichever control it affects (MIDI learn, still covered in the MIDI chapter (Chapter 10 — MIDI & Your DAW)), or simply a fixed, DAW-optimized default with no panel control at all — covered in the reference chapter (Chapter 12 — Reference). And the Presets browser, reached from the navigator, is its own chapter (Chapter 9 — Presets & Banks).
Your first sound in five minutes
Load Phaseburn One on an instrument track, then click the preset navigator at the top to open the browser. Pick anything from a factory bank — the list loads a preset the moment you click it — and play a note. You are hearing the full instrument; every preset is a finished starting point, not a demo.
Now change it with one knob. Open the OSC tab and find the PLL section — the Phase-Locked Loop is the main voice, a circuit that chases the pitch of a reference and never quite settles. Turn its TRACK knob down and play: the loop loosens, hunts and glides into each note instead of landing on it. Turn it up and the pitch locks solid. That one control is the difference between a weighted bass and a siren, and it is the fastest way to hear what makes this synth its own. The oscillators chapter (Chapter 2 — Oscillators) covers the rest of the loop.
Now let the instrument play itself. Open the GROOVE tab, confirm its SEQ switch is on — it is by default — and press BEATS in the generate row across the top. Then press play in your DAW: the sequencer runs from the host transport, in time with your project. It writes a groove from music-theory rules and plays it through your sound — hit BEATS again for a different one, press BOTH to write a matching melodic voicing with it, or reach for Vary on the Beats tab to mutate what you have; Undo beside it walks back the last ten grid edits. The GENERATE chapter (Chapter 8 — Generate) covers the groove families; the sequencer chapter (Chapter 7 — The Sequencer) covers how the notes are chosen.
That is a preset, a signature knob and a generated groove — the shape of most sessions with Phaseburn One. From here, follow whatever you just heard into its own chapter.
No sound? Check these
Silence almost always traces to one of a few ordinary things. Walk this list before suspecting the plugin:
The standalone is playing through the wrong interface. In the standalone app this is the first thing to try. Open the cog menu in the top-right corner and look at AUDIO DEVICE: Audio Output lists your machine’s outputs with Default at the top, which is what a fresh install uses and means “whatever the system is currently using”. Pick your interface if the system default is not it. The device is opened once, as the app starts, so a change takes effect the next time you launch Phaseburn One — the section says so under the pickers. If an interface you chose earlier has since been unplugged, the app still comes up, on the system default, and the row tells you so; your choice is remembered, so plugging the device back in and restarting is all it takes. In a plug-in there is nothing to choose here — your host owns the audio device — and the section is not shown.
Audio Input sits under it, and it is how the standalone feeds AUDIO IN. It lists your inputs with None first, and None is where a fresh install starts: Phaseburn One never opens a microphone or an interface input until you name one. Like the output, it applies at the next launch. What to do with the signal once it arrives is Audio from outside (Chapter 5 — Mixer & Patchbay).
Nothing loaded. If the preset footer reads “No preset loaded,” click the navigator and choose one, or press INIT and play — INIT is a plain but audible patch, a single oscillator at a comfortable level, so if it stays silent the cause is further down this list rather than an empty engine.
Playing the keys, still silent. Confirm your DAW is sending MIDI to this track: the track is selected or record-armed, and your controller feeds it. Phaseburn One plays notes you send in its default input mode; the MIDI chapter (Chapter 10 — MIDI & Your DAW) covers the routing.
The sequencer won’t run. Start your DAW’s transport — in FREE RUN the sequencer plays exactly when the host plays, so a stopped host holds it still; in the gated modes a held note is the transport. If the host is rolling and you still hear no pattern, check the SEQ switch on the Groove tab: with it off the note sequencer stays quiet while the rest of the instrument carries on. The MIDI chapter (Chapter 10 — MIDI & Your DAW) covers the input modes and the host lock.
Levels down somewhere. Each source has its own volume, the master section has one more, and the transport carries a master volume slider. A single source turned down can silence the voice while everything else looks fine — check the section volumes on the MIX tab and the master volume in the transport, and watch the transport’s output meter for signal. The mixer chapter (Chapter 5 — Mixer & Patchbay) maps the levels.
Anything that survives this list is worth telling us about. Phaseburn One is v0.3.0, and the open beta exists to find exactly these edges — the contact form reaches the people building it.
Where to go next
This manual follows the signal. For the voice itself, start with the oscillators (Chapter 2 — Oscillators), then shape it through the filter (Chapter 3 — The Filter) and the effects (Chapter 6 — Effects & Master), and set it moving with modulation (Chapter 4 — Modulation). For rhythm and generated lines, read the sequencer (Chapter 7 — The Sequencer) and GENERATE (Chapter 8 — Generate). For routing anything into anything, see the mixer and patchbay (Chapter 5 — Mixer & Patchbay). To play it from hardware or your DAW’s timeline, the MIDI chapter (Chapter 10 — MIDI & Your DAW). When you want the browser and the factory banks in depth, the presets chapter (Chapter 9 — Presets & Banks). And when you need an exact number, the reference (Chapter 12 — Reference) lists every parameter.